
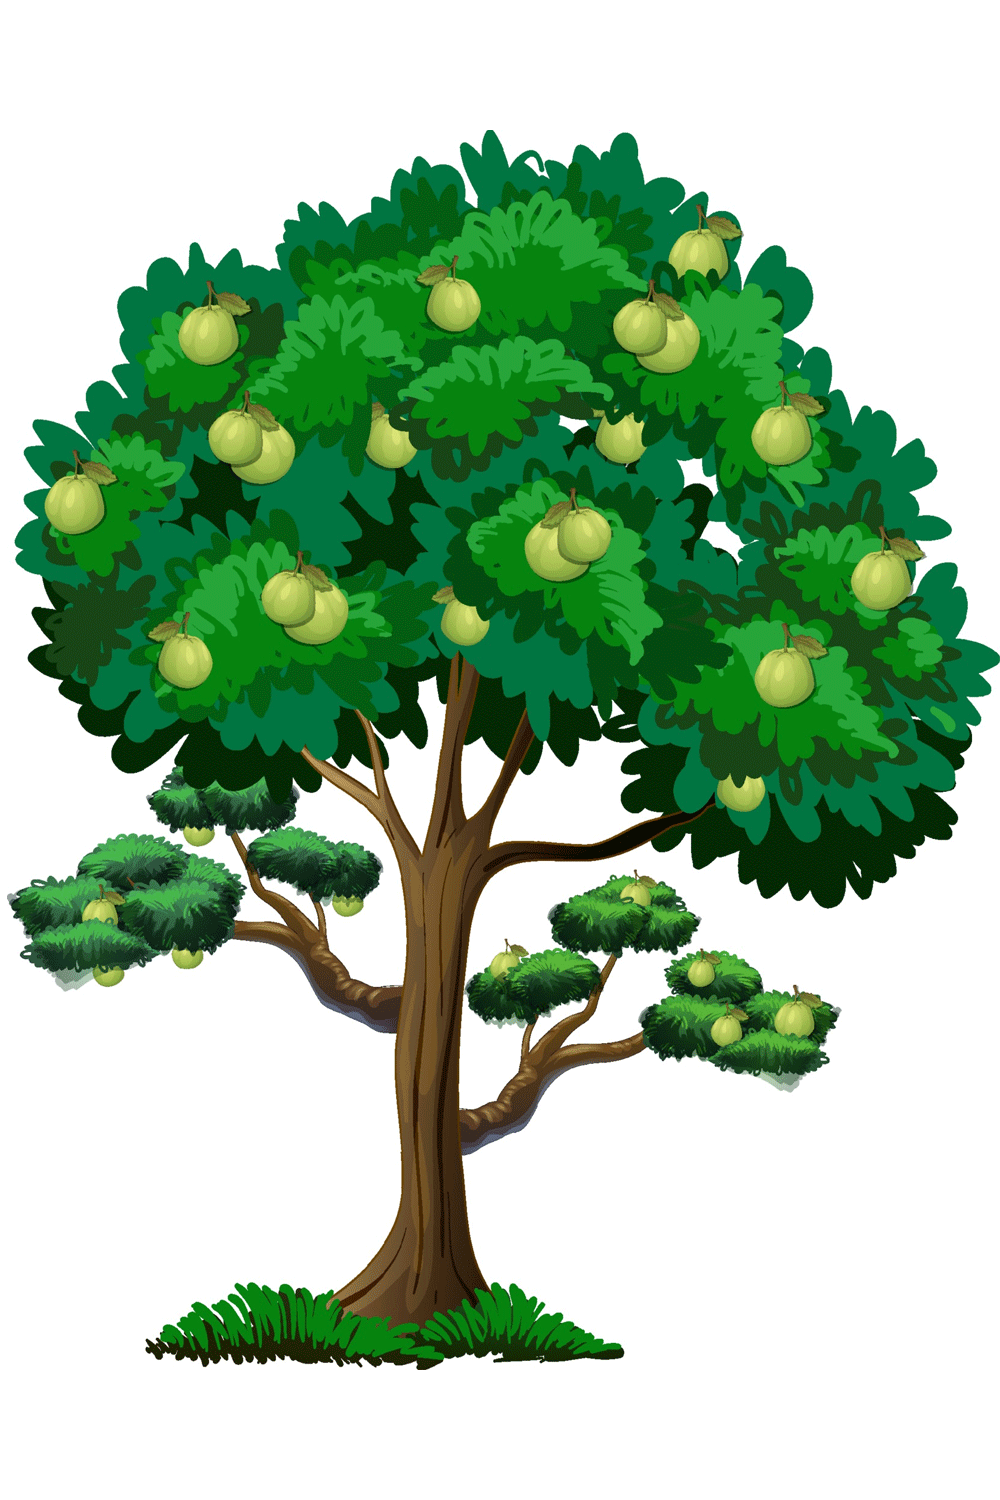
Drawing a guava tree is a fun and creative activity that lets you explore the beauty of nature while improving your artistic skills. The guava tree, known for its lush green leaves, spreading branches, and sweet fruits, offers an ideal subject for a beginner’s drawing. This step-by-step guide will help you draw a guava tree from scratch, making it easy even for those who are new to drawing.
Materials You’ll Need:
Before you begin drawing, make sure you have the right materials. Here’s a simple list:
- A black pen or fine liner (optional, for outlining)
- A sheet of drawing paper (preferably A4 or any comfortable size)
- A pencil (preferably a 2B for light sketching)
- Eraser (for corrections)
- Colored pencils, crayons, or watercolors (optional, for coloring)
Guava Tree
Figure out how to draw an incredible looking Guava Tree with simple, bit by bit drawing guidelines, and video instructional exercise. By following the basic advances, you also can undoubtedly draw a lovely Guava Tree or visit the spiderman coloring printable.
The guava is a tropical organic product local to South and Focal America. You can bring back a sample of the jungles with the assistance of this guava tree drawing guide. Guavas are eaten new (once in a while with salt or hot pepper), made into jams or jams, used to make pies and cakes, or filled in as a sweet with sugar and cream.
Step 1: Draw the Tree’s Trunk and Base
Start by drawing the base of the tree, which will represent the trunk. Guava trees have relatively thick trunks, so make sure your lines reflect that. Here’s how you can go about it:
- Begin by drawing two vertical lines near the bottom of your paper. These will form the trunk of the tree.
- Add a slight curve to both lines to make the trunk appear more natural. Guava trees often have trunks that are slightly tapered at the top.
- Now, draw a few horizontal lines near the bottom of the trunk to create the appearance of roots spreading out beneath the surface. These lines should be curved and uneven, reflecting the natural growth of a tree.
Step 2: Add the Tree’s Branches
Next, you’ll begin sketching the branches of the guava tree. Guava trees tend to have a wide spread, so you want to create branches that radiate outwards. Here’s how to add branches:
- Start at the top of the trunk and draw curved lines extending outward. Make sure the branches vary in length; some should be longer, others shorter, to create depth and a natural look.
- At the end of the branches, you can draw smaller lines that fan out to indicate smaller branches.
- Remember that branches grow in all directions from the trunk, so feel free to add many branches in varying positions.
Step 3: Add the Leaves
Guava trees are known for their broad, oval-shaped leaves with prominent veins. Let’s sketch out the leaves of the tree:
- On each branch, start drawing pairs of leaves. You can draw the leaves in a slightly diagonal pattern along the branches, grouping them in clusters for a fuller appearance.
- The leaves should be elongated with a slight point at the tip. The sides of the leaves should gently curve inward, giving them a natural shape.
- Add a central vein running vertically down the middle of each leaf, and from that vein, draw smaller veins branching off towards the edges.
- Continue adding leaves across the branches. Be sure to place them in different directions to mimic the natural flow of the tree.
Step 4: Draw the Guava Fruits
Guava trees are famous for their small, round fruits that grow throughout the tree. Drawing the guava fruits adds the finishing touch to your tree. Here’s how to do it:
- Start by drawing small, round shapes scattered around the tree, mainly towards the tips of the branches. Guava fruits are typically round or oval, but they can vary slightly.
- Keep the size of the fruits small compared to the size of the leaves and branches. Some guavas might overlap with the leaves or branches, adding to the natural look of the tree.
- Add small bumps or indentations at the top of the fruit where the stem connects to the branch.
Step 5: Add Details and Texture to the Trunk and Branches
Now that the basic structure of the tree is in place, it’s time to add some details and texture to make it more realistic:
- Using your pencil, lightly add texture to the tree trunk by drawing thin, vertical lines. These lines will give the trunk the appearance of rough bark.
- Add a few small branches and twigs coming out from the larger branches. This adds a layer of detail and realism.
- Use the same technique to add texture to the branches by drawing smaller lines along the curves of the branches.
Step 6: Outline the Drawing (Optional)
Once you’re happy with your sketch, you can outline it with a black pen or fine liner. This step will help bring the drawing to life and make the features stand out.
- Carefully trace over your pencil lines, including the trunk, branches, leaves, and fruits. Don’t forget to include the details, like the veins of the leaves and the texture of the bark.
- After outlining, let the ink dry for a few minutes before erasing any pencil marks to keep your drawing clean and neat.
Step 7: Add Color (Optional)
Coloring your drawing can transform it into a vibrant and realistic depiction of a guava tree. You can use colored pencils, crayons, or even watercolors, depending on what materials you have available.
Here’s how to color your guava tree:
- Trunk: Use a brown color for the trunk and branches. Make sure to layer different shades of brown to create the texture and depth of the bark.
- Leaves: Guava leaves are usually a bright or dark green. You can use different shades of green to add depth to the leaves, shading them darker near the veins and lighter towards the edges.
- Fruits: Guavas are typically pale yellow, green, or sometimes pinkish when ripe. Color them with light yellow or green, adding a bit of shading to make them appear three-dimensional.
- Shading: Add light gray or dark green shading along the trunk, under the branches, and beneath the leaves to give your drawing more depth.
Step 8: Final Touches
After you’ve colored your tree, take a step back and review your drawing. You may want to add some additional details, like small flowers near the base of the tree or more texture on the bark. A final layer of shading or highlights can also help enhance the look of your tree.
What do guava have an aftertaste like?
A few assortments are sweet, and others are sharp. Guava organic products have many seeds.
What will you concoct from your guava tree?
You can figure out how to draw a whole woods of tropical natural product trees. Take a stab at this coconut palm tree drawing. For additional simple and tomfoolery guides, see the How to Draw a Papaya Tree or Orange Tree drawing instructional exercises.
Guava Tree for Youngsters – Stage 1
Start the guava tree frame by drawing the grass developing underneath the tree. Utilize a progression of associated “U” formed lines. Stretch out bended lines upwards to shape the storage compartment of the tree.
From the storage compartment, stretch out additional sets of lines to demonstrate the branches. From the branches, expand even more sets of lines, framing more modest twigs.
Simple Guava Tree Drawing – Stage 2
Shape the tree trunk with short lines. Use “U” molded lines to encase the lower part of the verdant shade. Draw a couple of individual leaves close to the storage compartment. Utilize a bended line backtracked upon itself, to encase the leaf. Utilize a short line for the leaf and stem.
Simple Guava Tree Drawing – Stage 3
Extend the covering along the edges of your drawing, utilizing a progression of “U” molded lines. Draw groups of oval-formed leaves associated along a common stem. Then, draw the first of the guava natural products. For each, encase an egg shape. Then, define a short wavy boundary at the lower part of each organic product. This is where the blossom was once joined.
Simple Guava Tree Drawing – Stage 4
Keep drawing the shelter of your animation guava tree. Utilize associated “U” formed lines, sprinkled with oval-molded leaves associated with stems.
Simple Guava Tree Drawing – Stage 5
Keep drawing the shade of the guava tree. Utilize associated “U” molded lines, scattered with oval-formed leaves associated with stems.
Simple Guava Tree Drawing – Stage 6
Wrap up encasing the shelter of the guava tree, utilizing a progression of “U” molded lines sprinkled with additional definite lots of leaves. Draw one more pack of leaves inside the overhang. Underneath it, encase the adjusted egg state of the organic product with a short scalloped line at the base.
Simple Guava Tree Drawing – Stage 7
Draw more lots of leaves with balancing organic product inside the shade. For the leaves, use ovals associated by the lines of their veins and stems. The guavas are egg-molded with a little scalloped shape at the base.
Add More Subtleties to Your Guava Tree Picture – Stage 8
Draw more lots of leaves with balancing organic product inside the shade. For the leaves, use ovals associated by the lines of their veins and stems. The guavas are egg-formed with a little scalloped shape at the base.
Complete the Layout of Your Guava Tree Drawing – Stage 9
Complete your guava tree frame by drawing more lots of leaves with draping natural product inside the shade. For the leaves, use ovals associated by the lines of their veins and stems. The guavas are egg-formed with a little scalloped shape at the base.
Variety Your Guava Tree Drawing – stage 10
Variety your animation guava tree. Most guava natural product is green inside with dazzling red or pink inward tissue. Some, like the strawberry guava, are red when ready.